


Optical fiber fusion splicer is mainly used for the construction and maintenance of optical cables in optical communications, so it is also called optical cable fusion splicer. The general working principle is to use high-voltage arc to melt the two optical fiber sections and use high-precision motion mechanism to smoothly push the two optical fibers into one to achieve the coupling of optical fiber mode field.
Main uses of optical fiber fusion splicer
1. Optical cable line construction, maintenance, and emergency repair of telecommunications operators, communication engineering companies, and institutions
2. Experimentation, production and testing of optical devices;
3. Scientific research;
4. Teaching and research on optical fiber communication majors in major universities.
Optical fiber fusion splicer products are divided into ordinary optical fiber fusion splicers generally refer to single-core optical fiber fusion splicers. In addition, there are also ribbon optical fiber fusion splicers specially used for splicing ribbon optical fibers, splicing sheathed optical cables and jumpers, and splicing polarization-maintaining optical fiber fusion splicers. According to different alignment methods, optical fiber fusion splicers can also be divided into two categories: cladding alignment type and core alignment type. The cladding alignment type is mainly suitable for occasions such as fiber-to-the-home that do not require high requirements, so the price is relatively low; the core alignment type fiber fusion splicer is equipped with a precision six-motor core alignment mechanism, a specially designed optical lens and software algorithm, which can accurately identify the fiber type and automatically select the matching fusion mode to ensure the fusion quality. It has a high technical content, so the price will be relatively high.
The use process of the fiber fusion splicer The most common single-core fiber fusion splicer is generally basically the same:
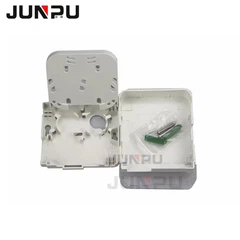
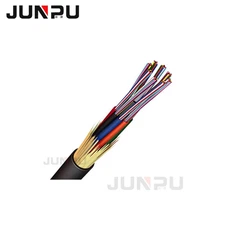
1. Strip the optical cable and fix the optical cable to the fiber tray. Common optical cables include layer-twisted, skeleton-type and central bundle-tube optical cables. Different optical cables require different stripping methods. After stripping, the optical cable should be fixed to the fiber tray.
2. Pass the stripped optical fiber through the heat shrink tube separately. Optical fibers of different bundles and different colors should be separated and passed through the heat shrink tube separately.
3. Turn on the power of the fusion splicer and select the appropriate fusion method. Common types and specifications of optical fiber include: SM dispersion non-shifted single-mode fiber (ITU-T G.652), MM multimode fiber (ITU-T G.651), DS dispersion-shifted single-mode fiber (ITU-T G.653), NZ non-zero dispersion-shifted fiber (ITU-T G.655), BI bend-resistant fiber (ITU-T G.657), etc. The appropriate fusion splicing method should be selected according to the different types of optical fibers. The latest optical fiber fusion splicer has the function of automatically identifying optical fibers, which can automatically identify various types of optical fibers.
Prepare the optical fiber end face. The quality of the optical fiber end face will directly affect the quality of fusion splicing, so a qualified end face must be prepared before fusion splicing. Use a special stripping tool to strip the coating layer, and then wipe the bare fiber several times with a clean linen cloth or cotton soaked in alcohol. Use a precision optical fiber cutter to cut the optical fiber. For 0.25mm (outer coating) optical fiber, the cutting length is 8mm-16mm, and for 0.9mm (outer coating) optical fiber, the cutting length can only be 16mm.
Place the optical fiber. Place the optical fiber in the V-groove of the fusion splicer, carefully press the fiber pressure plate and fiber clamp, set the position of the optical fiber in the pressure plate according to the fiber cutting length, and put it into the wind shield correctly.
Connect the optical fiber. After pressing the connection button, the optical fibers move toward each other. During the movement, a short discharge is generated to clean the optical fiber surface. When the gap between the optical fiber end faces is appropriate, the fusion splicer stops moving toward each other, sets the initial gap, and measures and displays the cutting angle. After the initial gap is set, the core or cladding alignment is started, and then the fusion splicer reduces the gap (the last gap setting). The arc generated by the high-voltage discharge melts the left optical fiber into the right optical fiber. Finally, the microprocessor calculates the loss and displays the value on the display. If the estimated loss value is higher than expected, you can press the discharge button to discharge again. After the discharge, the fusion splicer will still calculate the loss.
Take out the optical fiber and use the heater to reinforce the optical fiber fusion point. Open the wind shield, take out the optical fiber from the fusion splicer, move the heat shrink tube to the position of the fusion point, put it in the heater for heating, and take out the optical fiber from the heater after heating. During operation, do not touch the ceramic part of the heat shrink tube and the heater due to the high temperature. 8. Coil and fix the fiber. Coil the connected optical fiber onto the optical fiber storage tray, fix the optical fiber, storage tray, joint box, terminal box, etc., and the operation is completed. 5. Maintenance of optical fiber fusion splicer The consumable material of the optical fiber fusion splicer is the discharge electrode. It is necessary to replace the new electrode after about 4,000 discharges. 6. Method of replacing the electrode
First, remove the protective cover of the electrode chamber, loosen the screws that fix the upper electrode, and take out the upper electrode. Then loosen the screws that fix the lower electrode and take out the lower electrode. The installation sequence of the new electrode is opposite to the disassembly action, and the gap between the two electrode tips is required to be: 2.6±0.2mm, and symmetrical with the optical fiber. Under normal circumstances, the electrode does not need to be adjusted. Do not touch the tip of the electrode during the replacement process to prevent damage, and avoid the electrode falling into the machine. After replacing the electrode, the arc position must be calibrated or processed by yourself and re-polished, but the length will change and the corresponding welding parameters must also be modified.